Unlike many other forms of identification, age is not a factor when it comes to crossing international borders. Even a baby who is only a few days old requires a valid passport to leave and re-enter the country. While the concept is straightforward, the execution involves a specific set of bureaucratic hoops that are strictly enforced to prevent international child abduction and ensure the safety of the child.
This guide will walk you through the detailed process of obtaining a United States passport for a newborn. While the process can feel overwhelming, breaking it down into manageable steps makes it entirely achievable. The key is preparation, patience, and understanding the unique requirements that apply to minors under the age of 16.
Step 1: Gather the Essential Documents
Before you even think about booking an appointment, you must gather all necessary documentation. The State Department has strict evidentiary standards. The first document you will need is the Form DS-11. This is the standard application for a U.S. passport. You can fill this out online and print it, or print a blank PDF and fill it out by hand using black ink.
A crucial rule regarding the DS-11 form is the signature. Do not sign the application until you are in the presence of an acceptance agent. Signing it beforehand will void the form, and you will be forced to fill it out again, wasting valuable time during your appointment.
Step 2: Proof of Citizenship
You must prove that your newborn is a U.S. citizen. For most parents, this means providing a certified birth certificate. It is important to note that the “commemorative” birth certificate with footprints often issued by hospitals is generally not accepted for passport applications. You need the official certificate issued by the city, county, or state.
This birth certificate must list the parent(s) full names. When you submit your application, you must submit the original (or certified copy) and a photocopy. The original will be mailed with the application to the State Department and returned to you later, usually in a separate mailing from the passport itself.
Step 3: Proof of Parental Relationship
The acceptance agent needs to verify that the adults applying for the passport are indeed the legal parents or guardians of the child. Fortunately, a certified U.S. birth certificate usually serves dual purposes: it proves the child’s citizenship and, by listing the parents’ names, proves the parental relationship.
If you are using a Consular Report of Birth Abroad or a foreign birth certificate for an adopted child, ensure these documents also clearly list the parents. If the name of a parent has changed since the birth certificate was issued (for example, due to marriage), you will need to provide documentation such as a marriage certificate to link the names.
Step 4: Parental Identification
Parents cannot simply vouch for their identity; they must prove it. When you go to the passport acceptance facility, both parents must present a valid, government-issued photo ID. This is typically a driver’s license, a valid military ID, or a current passport.
In addition to presenting the physical ID card to the agent, you must bring photocopies of the front and back of each ID on plain white paper. Do not cut the paper to size; leave the images on the standard 8.5 x 11-inch sheet. Having these copies ready beforehand will speed up your appointment significantly.
The Two-Parent Consent Rule
One of the most significant hurdles in getting a passport for a minor is the requirement for two-parent consent. To prevent one parent from taking a child abroad without the other’s knowledge, U.S. law generally requires both parents to appear in person with the child to apply for the passport.
If both parents are present, you simply both sign the DS-11 form in front of the agent. However, life is rarely that simple, and the State Department has contingencies for various situations where both parents cannot attend.
If one parent cannot attend the appointment, the absent parent must complete Form DS-3053 (Statement of Consent). This form must be notarized and submitted with the application. It is vital that the notary signs and dates the form on the same day the absent parent signs it, and a photocopy of the absent parent’s ID (front and back) must accompany the form.
If the other parent is not in the picture, or you have sole legal authority, you must provide evidence of this. Acceptable evidence includes a court order granting sole legal custody, a court order specifically permitting you to apply for the child’s passport, a death certificate of the other parent, or a birth certificate listing only one parent.
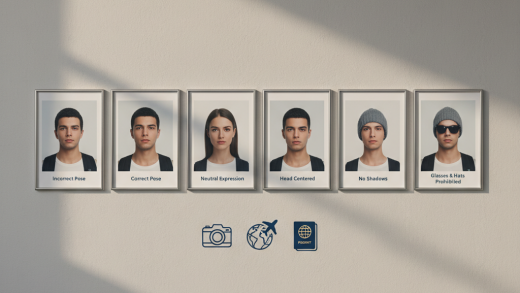
The Challenge of the Newborn Photo
Perhaps the most comical yet frustrating part of the process is obtaining a compliant passport photo for a newborn. The requirements are strict: the baby must face the camera, eyes should be open, the background must be plain white or off-white, and no other person can be in the shot.
You cannot hold the baby in your arms, as your hands or shirt would be visible. There are two popular methods to achieve a compliant photo. The first is the Car Seat Method. Drape a plain white sheet over the car seat and buckle the baby in (ensure the straps are covered by the sheet or not visible). This provides the necessary white background and support.
The second method is the Floor Method. Lay a white sheet or blanket on the floor and lay the baby on their back. You can then stand over the baby to take the photo. Ensure you do not cast a shadow on the baby’s face, as shadows are a common reason for photo rejection.
Do not worry if the baby’s head is slightly tilted or if their expression is not perfectly neutral—the State Department is slightly more lenient with infants regarding facial expressions. However, the eyes must generally be open. If your newborn is sleeping, you may need to gently tickle their feet or wait until after a nap.
Calculating the Fees
Passport fees are subject to change, so always check the latest rates on the official government travel website. Typically, there are two separate fees: an application fee paid to the U.S. Department of State and an acceptance fee (execution fee) paid to the facility where you submit the application.
It is highly recommended to bring personal checks or money orders. Many acceptance facilities, particularly post offices, require the State Department fee to be paid by check or money order specifically, while the execution fee might be payable by credit card. Being prepared with a checkbook avoids a last-minute scramble.
Finding an Acceptance Facility
You cannot mail in a passport application for a newborn; it must be done in person. You will need to locate a Passport Acceptance Facility. These are commonly found in post offices, public libraries, clerks of court offices, and other municipal government buildings.
Appointments are increasingly mandatory. Since the post-pandemic travel surge, walk-in services have become rare. Check the facility’s website or call ahead to schedule a time slot. Attempting to walk in without an appointment often results in being turned away.
The Appointment Day
On the day of the appointment, bring your baby, both parents (unless using the consent forms discussed earlier), and your folder of documents. It is wise to arrive early. If you are late, you may lose your slot. The agent will review your forms, check your IDs, swear you in, and witness your signatures.
Bring a diaper bag and be prepared for a wait. If the baby is crying or fussy, don’t panic; the agents are used to dealing with children. As long as the baby is physically present for the verification, the mood of the infant is irrelevant to the legal process.
Processing Times and Expediting
Once submitted, the waiting game begins. Routine processing can take anywhere from 6 to 11 weeks depending on the season and backlog. If you have travel plans coming up sooner, you should pay the extra fee for expedited service.
Expedited service significantly reduces the processing time, usually to a window of 3 to 5 weeks. For even faster shipping, you can pay for 1-2 day delivery for the return of the completed passport. Note that processing times start from the day the agency receives your application, not the day you submit it at the post office.
If you have a life-or-death emergency or urgent travel within 14 days, you may be able to make an appointment directly at a regional Passport Agency. These are different from acceptance facilities (post offices) and usually require proof of immediate travel.
Receiving the Passport
When the passport finally arrives in the mail, verify all the information immediately. Check the spelling of the name and the birth date. A common question parents have is about signing the passport. Do not sign your child’s name.
For a child under the age of 16, the parent must sign the passport. In the space provided for the signature, the mother or father typically prints the child’s name and signs their own name next to it, noting their relationship in parentheses, for example: “(Mother)” or “(Father)”.
Validity and Renewals
Unlike adult passports which are valid for 10 years, a child’s passport is only valid for 5 years. This is because a child’s appearance changes drastically in a short period. When the passport expires, or if the child’s appearance changes so significantly that they are unrecognizable from the photo, you will need to apply for a new one.
Crucially, you cannot renew a child’s passport by mail using Form DS-82. Every time a child under 16 needs a new passport, you must go through the in-person application process again, effectively repeating the steps outlined in this guide.
Supporting Documents Return
Do not panic if the passport arrives but the birth certificate is missing. The State Department sends the new passport and your supporting documents (like the original birth certificate) in separate mailings. The supporting documents usually arrive a week or two after the passport.
Final Thoughts on Infant Travel
Getting a passport for a newborn is a rite of passage for traveling families. While the paperwork, photocopies, and photo attempts may test your patience, holding that tiny blue book is the first step toward a lifetime of adventure for your child. By following these steps meticulously, you ensure that the only thing you have to worry about at the airport is the diaper bag.